Monday, 28 March 2016

Kaya Pandan Swiss Roll

This Kaya Pandan Swiss Roll was so Amazingly~~~ Delicious!!!!!!!!! My hubby 1st bite was like shocking looking at me.. I sensed "Jialat Liao my kaya cake not nice" !!! But in the end he 2X THUMBS UP!!!!!!!! Making me dropping to hell flying to the HEAVEN !!! Hahaha...... 

It's a very easy and fast recipe ... Not much complicated steps. Everybody who likes kaya should try it!!! Cheers...

Here's the simple recipe :

Kaya Pandan Swiss Roll
**modified recipe
(Credit to: Kitchen Tigress's Vanilla Swiss Roll)

Ingredients:
Cake flour 40g
Egg yolks 60g
Sugar 60g
Egg whites 140g
Pandan paste 3-4 drips
Oil 60g
Pinch of salt

Oil / butter for greasing pan

Kaya (Fillings)
Coconut flakes (For deco, it's optional)

Tools:
12" x 10" cake tray
Parchment Paper


Method :
- Beat the egg whites till bubbles formed, add in sugar gradually into 3-4 batches.

- Beat the meringue till firm peak, which the whisk could hold firmly on it when u lifting up.

-Add yolks to whites in 4 batches, using a hand whisk evenly mixed after each addition.

-Sieve half of cake flour into mixture, add salt , whisk it very slowly till batter evenly mixed. (Don't over-mixed)

-Add oil whisk till evenly mixed. 

-Add 3-4 drips of Pandan paste.

-Using a spatula doing the last folding.

-Line with parchment paper, grease pan with oil / butter. (I'm using oil to grease)

-Pour the Pandan batter slowly,


I'm using a small spatula to spread the batter evenly to the edges. 

-Lifted up the cake tray, balance the batter level it evenly. Tap on worktop few times to burst the air bubbles inside.

-Bake in a preheated oven , place it on the MIDDLE rack .
(For Rowenta oven user, baking @190 degree for 15mins. 1st 8mins place a tray on the TOP rack / use a aluminium foil cover the cake to block the heat from over burning the cake.) 
** For other oven brand user recommended kitchentigeress's baking duration and baking tempt.
Refer link with video: 

Nicely baked!!! Feeling so GREAT!!!

- After bake, flip over to a new piece of parchment paper. 

-Peel off the parchment paper on the cake. Leave it to completely cooled.


-Spread kaya evenly on the cake. 


-Rolled it with both hands slowly and tightly . Make sure both sides r balance.

Wahhhh... It's amazingly beautiful Swiss roll !!! Without any cracks... Phew!!! 

-This part it's optional step... I'm spreading a very thin layer of kaya on the exterior surface, preparing to sprinkle coconut flakes on it later.

I'm using Bake King brand coconut flakes. (Bought it @ Sheng Shiong)

-Sprinkled coconut flakes for better taste.

"Kaya Pandan Swiss Roll" fast and easy recipe !!!!!!! NICELY DONE!!! 

Sliced off both ends , then placed it in your mouth !!! Nom... Nom... Hahahaha

This kaya Pandan Swiss roll texture was soooo fine and soft ...spreading with kaya fragrance in your whole mouth!!! Mmmm.... 


Thanks for browsing Surelicious Bakie.. Hope u like this yummidelicious "Kaya Pandan Swiss Roll" recipe!!! 

                    Surelicious Bakie 


Thursday, 24 March 2016

Mocha Chiffon

Anyone here loves Starbucks's Frappuccino / CBTL 's Mocha ice-blended drink??? Why not customise and bake a Mocha cake yourself or for those coffee lovers like me.... They definitely loving it~~~~


Here's the recipe...

Mocha Chiffon

Ingredients:

(A) Batter
Cake flour 100g
Baking powder 3/4 tsp
Salt 1/4 tsp

Egg yolk 5 (Medium size eggs)
Corn Oil 80g
Caster sugar 70g

Coco powder 15g
Instant coffee powder 5g
Milk 100g

(B) Meringue 
Egg white 5 (Medium size eggs)
Cream of tartar 1/4 tsp
Castor Sugar 70g

Utensils: 18cm~20cm chiffon pan

Method:
-Prepare the mocha mixture.

-Measure cocoa powder 15g and instant coffee powder 5g. Mix together in a bowl.

-Boil the milk under heat, then add cocoa + coffee powder into it. 

-Using hand whisk stir it till cocoa + coffee powder melted.

Mmmm... Smell heavenly with strong Mocha AROMA~ 

-OFF the heat, leave it lukewarm. 

-Beat the eggs yolks for 2-3mins, add in sugar gradually into 3-4 additions, then add in oil. 

- Lastly add in the mocha mixture and beat it till batter is incorporated. 

DONE !!! Pour into a big mixer bowl. Set aside...

-Sieve cake flour + baking powder + salt together into it with 3-4 additions gradually at a time. 

- I'm using a hand whisk to fold it in each addition of cake flour. 

MOCHA batter done!!! Next meringue...

-Add in egg whites beat till bubbles formed. Add in cream of tar tar beat for 30 secs, add in sugar gradually. 

-Continue beat the meringue till soft / firm peak, which the meringue can hold firmly onto the whisk. 

-Add in 1/3 of meringue into mocha batter. I'm using hand whisk to fold it. 

-Add another 1/3 and fold until almost combined. 

-Add the last portion and switch to a spatula to scoop the batter from the bottom of the bowl and fold up. 

-Tap the mixer bowl on worktop a few times to burst out the air bubbles inside the batter. Then pour very slowly into chiffon pan at 1 position. 

-Tap the chiffon pan a few times on worktop again to burst out the air bubbles before baking. 

-Place it into a preheated oven, bake @ 170 degree for 20 mins. 

-After 20 mins... REDUCED the tempt to 160 degree bake for another 20 mins. 
-After bake , inverted the chiffon pan let it cooled. Unmould it gently with bare hands. 

The cake was so tall and the texture was so soft and fluffy!! Mmmm... Feeling a Great Satisfication!!! Yeah...

Thanks for browsing Surelicious Bakie... 

Have a great weekend holidays....
Happy Good Friday everyone!!! Cheers...!!!

                    Surelicious Bakie


Wednesday, 23 March 2016

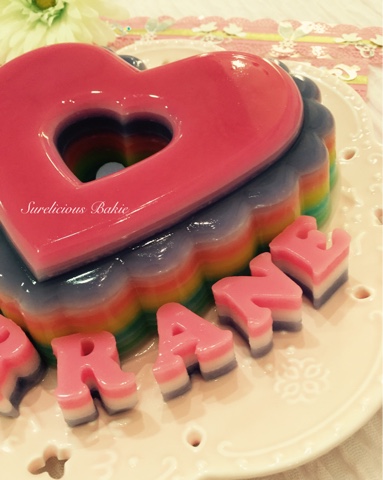
Heart Shaped Rainbow Agar Agar

It's a great opportunity sharing my birthday with my beloved sis-in-law. Specially made a rainbow agar agar cake for her birthday!!! 


Ingredients:
Coconut Rainbow agar agar

(Ingredients measured in this heart shaped mould)

Water 1000ml
Agar agar powder 10g 
Coconut milk 130g
Sugar 200g-250g
Pandan leaves 1 bunch

Heart shaped mould used , bought from 5B @ Joo Chiat .

Method:
-Boiled water, add in all ingredients till completely melted.
-Take out the Pandan leaves and u may throw away.
-Scoop out a portion in a bowl, add coloring. 
-Pour into the mould, leave it cool till it turn slightly harden/dry.
-Same method, add the next Color , this time using a small spoon gently spread on 2nd layer ,  same procedures continue to the next color.

-Refrigerate the whole agar agar into fridge for 2-3hrs. 
(My rainbow layers sequence is Color, white, Color, white...)

I was extremely overwhelmed after unmoulded it!!! It's Soooo amazingly  beautiful !!! 

Beautiful pastel rainbow Colours layerings.


My sis in law love it so much ... leaving her a special birthday with homemade LOVE !!! 

Thanks for browsing ... my Surelicious Bakie blog !!! Hope u love this easy recipe !!! Cheers ...!!!

                  Surelicious Bakie